 Share
Share


Want to create a skincare ad image? Connect your AI assistant to Framia MCP, describe the bottle, lighting, and composition, then open the canvas to approve generation and download the result. Choose your setup below.
Use Codex on an Apple Silicon Mac
Use this option if you run Codex on an Apple Silicon Mac. Check that your Codex version supports local Plugins, and have a Framia account with workspace access ready. Codex can handle installation; you complete sign-in and authorization in the browser.
The download center recommends sending this instruction to Codex:
Read https://mcp.framia.pro/install/plugin.md and follow it. Download and extract the stable macOS Apple Silicon Framia Plugin, then run its bundled auth plugin-login to open my browser. Wait while I sign in and choose my workspace and permissions; install it in Codex, then tell me to quit and reopen Codex so I can verify a read-only project list in a new chat.When the browser opens, sign in to your own Framia account, choose the workspace, and select the permissions for this image task: project:read, project:create, task:execute, task:read, resource:read, and resource:download.
To install manually, get the current macOS Apple Silicon Codex Plugin ZIP and follow the Plugin Setup Guide. Do not use a CLI package as a Plugin. Extract the ZIP into a user-owned folder and inspect framia/README.md, framia/.codex-plugin/plugin.json, and framia/.mcp.json.
Before signing in or installing, check for an older Framia installation. From the folder containing framia/, run:
./framia/bin/framia plugin retire-legacy --dry-runIf the report shows legacy_found: true, run the retirement command before installing the new Plugin:
./framia/bin/framia plugin retire-legacyThis signs out the legacy remote connection before removing a pre-1.0.6 Plugin. For 1.0.6 or newer, do not disconnect the existing Plugin just to update it; the new bundled login replaces its private Plugin authorization. If the report flags a manually configured Framia server, review that conflict with the official guide before changing your configuration.
Next, start the separate Plugin login from the same folder. Complete the browser steps yourself and wait for the command to finish successfully:
./framia/bin/framia --environment prod auth plugin-loginIf the browser does not open, use the URL printed in Terminal. If the command reports AUTH_INCOMPLETE and asks for --restart, repeat it with --restart. Do not paste tokens into chat or delete credential files. The Plugin uses its own profile, not the standalone CLI login or the old host Authenticate button.
Register the extracted framia/ folder in a user-local Codex marketplace, then install it through Codex’s supported Plugin flow. Use the official local Plugin instructions for the marketplace format; keep other plugins and connection settings unchanged.
Fully quit and reopen Codex after installation. For the Codex CLI, close every running Codex session and start it from a new Terminal window. Open a new chat, confirm that Framia’s tools are loaded, and ask it to list your projects. An empty project list can be a normal result. Do not use a paid generation as an installation test, or use standalone CLI auth status to check Plugin authorization.
Use ChatGPT, Claude, Cursor, or another compatible client
Use this option with a client that supports remote Streamable HTTP MCP and OAuth authorization-code flow with PKCE S256. Confirm the host and version first, and have a Framia account with workspace access ready. No installation package is needed.
Follow your client’s documented manual connection flow and the MCP Setup Guide to add Framia’s production endpoint:
https://mcp-api.framia.pro/multimodal/mcpThe client must use an approved client registration and its own approved redirect URI. Framia does not currently advertise dynamic client registration. If the client is unknown or its callback is rejected, get publisher or administrator guidance; do not copy another client’s callback or invent a registration.
Start authorization from the client when you are ready. In the browser, sign in to your own Framia account, choose the workspace, and grant the permissions for this image task: project:read, project:create, task:execute, task:read, resource:read, and resource:download. Being signed in to the browser does not grant workspace access by itself.
After authorization, confirm that Framia’s tools appear, then open a new chat and ask it to list your projects. Only query the projects—do not create or modify anything for this check. You do not need to run the CLI login command. If the client lacks the required connection settings or registration, stop and use the official host-specific guidance rather than guessing a configuration.
Use the terminal or an existing workflow
Use the CLI if you prefer working in a terminal or want to add generation tasks to an existing workflow. You need a terminal, a Framia account with workspace access, and the download for your operating system and processor.
Choose the current stable download from the official CLI download center. The macOS Apple Silicon download is framia-darwin-arm64.zip; the listed Intel Mac and Linux downloads are standalone binaries, and Windows uses an .exe. Do not treat every download as a ZIP.
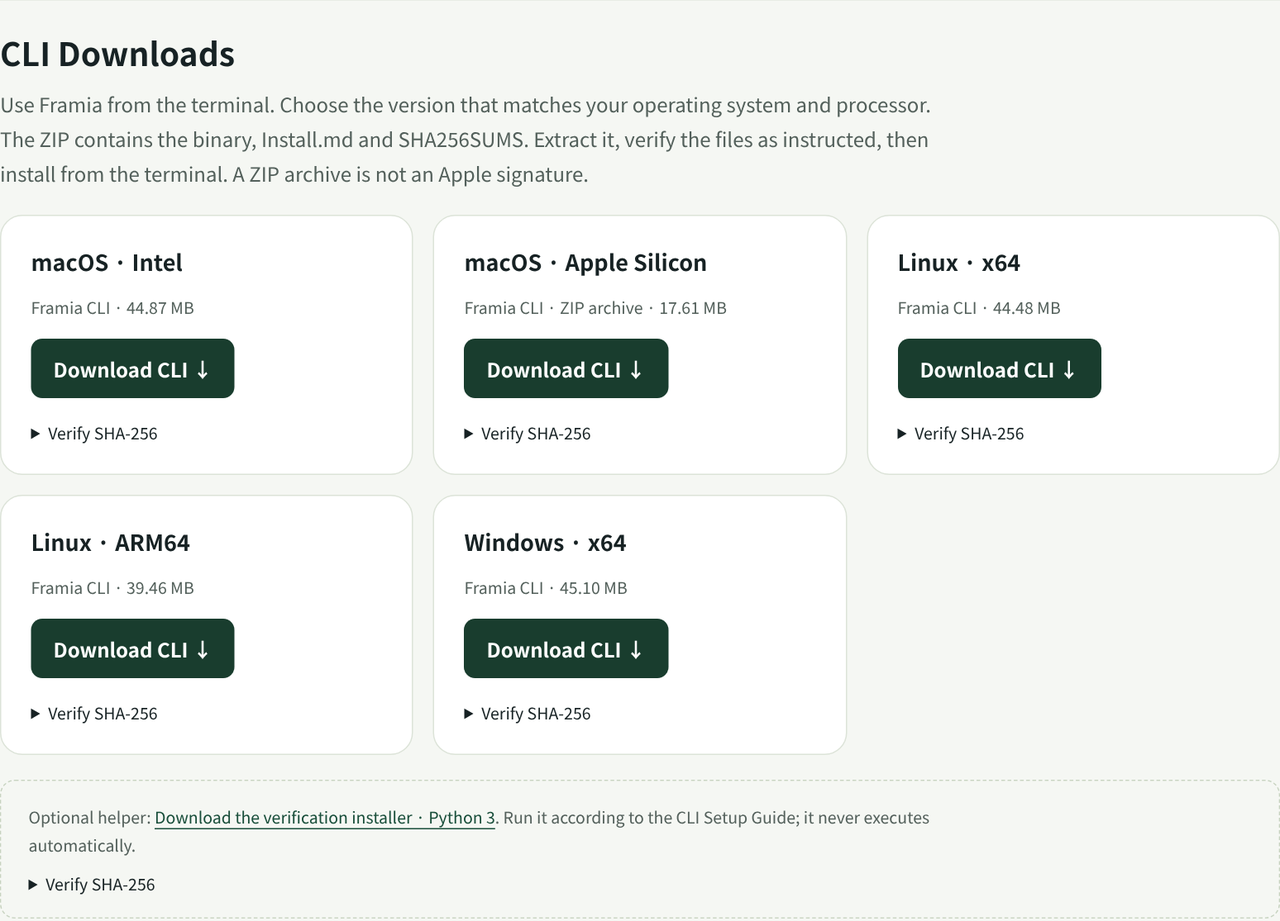
The following commands use an Apple Silicon Mac and macOS’s default zsh. Save framia-darwin-arm64.zip in a folder you can find easily, open Terminal there, and verify the archive before extracting it:
shasum -a 256 framia-darwin-arm64.zipCompare the returned hash with the SHA-256 shown for that exact download. If they differ, stop and download a consistent release again. Extract into a new folder, then verify the files before installation.
Run each command below in order, in the same Terminal window. If any command reports an error, stop before continuing.
unzip framia-darwin-arm64.zip -d framia-cli cd framia-clishasum -a 256 -c SHA256SUMSContinue only after every file in the checksum list reports OK. Read the included Install.md before installing.
If ~/.local/bin/framia already exists, inspect its version and approve the update before replacing it. Stop on an unexpected or modified binary, and do not overwrite unrelated files.
mkdir -p "$HOME/.local/bin" install -m 0755 ./framia "$HOME/.local/bin/framia"export PATH="$HOME/.local/bin:$PATH"framia versionThe version command should show the release you selected and the prod environment. This is an installation check, not proof of login or workspace access.
The export PATH line applies only to the current Terminal window. To make framia available in future zsh windows, add this line to ~/.zshrc and open a new window:
export PATH="$HOME/.local/bin:$PATH"On an Intel Mac, Linux, or Windows, verify the matching file and follow the CLI Setup Guide for your system. Install only in your own user-local directory. A ZIP is not an Apple signature; verification does not remove macOS security prompts.
The optional install_framia.py helper needs Python 3.10 or newer. Before running it, follow the CLI Setup Guide to lock the stable version, verify the release manifest and installer, and inspect the saved installer source. Run its --help first, then pass --version with that verified stable version. Stop if stable changes before installation.
The helper installs to ~/.local/bin by default, or %LOCALAPPDATA%/Framia/bin on Windows. It does not modify PATH or sign you in. Updates and replacement of existing binaries require explicit approval; do not add overwrite flags automatically. Once the local version check succeeds, continue with sign-in and authorization.
Already installed? Scroll to “Sign in and authorize” to continue.
This walkthrough uses one skincare product image to show the full process. Follow one installation option, then continue with authorization, a connection check, and your first creative task.

What Framia MCP does
You might already ask AI to write an image prompt, then copy it into a generation tool. With Framia MCP connected, a compatible AI assistant can call Framia’s tools and submit that brief as a task.
MCP stands for Model Context Protocol. Think of it as a standard connector: tools that follow the same connection rules can work together. Here, it lets your AI assistant find Framia’s tools and use them within the permissions you grant.
Framia MCP supports project and resource operations, as well as image, video, and audio tasks. Results stay in a Framia project, where you can open the canvas and keep working. You do not need to host a server yourself.
Explore Framia MCP to see the available connections and start creating with your AI assistant.
Why choose Framia MCP
The first generated image is often just a starting point. You still need to inspect the details, change the background, and try another version. Framia MCP keeps that work in a Framia project. Describe the task in your AI conversation, then open the project canvas to review settings, see the result, and continue working.
| How you want to work | Framia MCP | Other MCP |
|---|---|---|
| Start with the tools you use | Choose the Codex Plugin, Framia CLI, or remote MCP. Use the Plugin in Codex, the CLI in Terminal, or connect a compatible client directly. | The compared workflow connects to AI assistants through an installable Skill. |
| Connect without handling an API key | Sign in through your browser, select a workspace, and approve the requested permissions. The CLI and Plugin need no manually entered service URL or token. | The compared setup asks you to copy an API key from account settings and configure it in your AI assistant. |
| Review settings before spending credits | With approval enabled, review the model, image settings, and estimated credits before confirming generation. Delegate the request while keeping the key decision in your hands. | The page describes credit charges by model and video length, but does not explicitly show a comparable pre-generation confirmation flow. |
| Keep working after the first result | Results stay on the project canvas, where you can inspect them, continue working, and download files. You have a project to return to for the next version. | Supports editing and reusing past creations in the conversation, with a focus on in-chat production and finished output. |
| Build an ongoing creative project | Call project, task, and resource tools within your authorized workspace, rather than only submitting individual generation requests. | The page emphasizes generation, editing, and reuse of previous videos and shots. |
If you are looking to replace your current creative integration, try Framia MCP on work that needs another round after generation: a product image with room for copy, ad variations with different backgrounds, or a video project that needs more work.
The skincare example below lets you try that workflow yourself: submit a task, review the generation card, and open the canvas to inspect and continue working on the result.
Before you start
| What you need | What to check |
|---|---|
| Framia account | Have your own Framia account ready for sign-in and authorization. |
| Workspace access | Make sure you have joined the workspace you plan to use. Signing in does not give you access to every workspace or project. |
| Codex Plugin | You need an Apple Silicon Mac and a Codex version that supports local Plugins. The Plugin ZIP is not a CLI package and must not be installed on another platform. |
| Framia CLI | Get the matching package from the official download center: macOS (Intel / Apple Silicon), Linux (x64 / ARM64), or Windows (x64). |
| Remote MCP client | Your host and version must support remote Streamable HTTP MCP, OAuth authorization-code flow with PKCE S256, and an approved client registration and redirect URI. No installation package is needed. |
| Service address | The CLI and Plugin include the service address; no URL or token needs to be entered manually. For remote MCP, add https://mcp-api.framia.pro/multimodal/mcp in the client settings. |
| Internet connection | Stay connected during setup, authorization, and generation. |
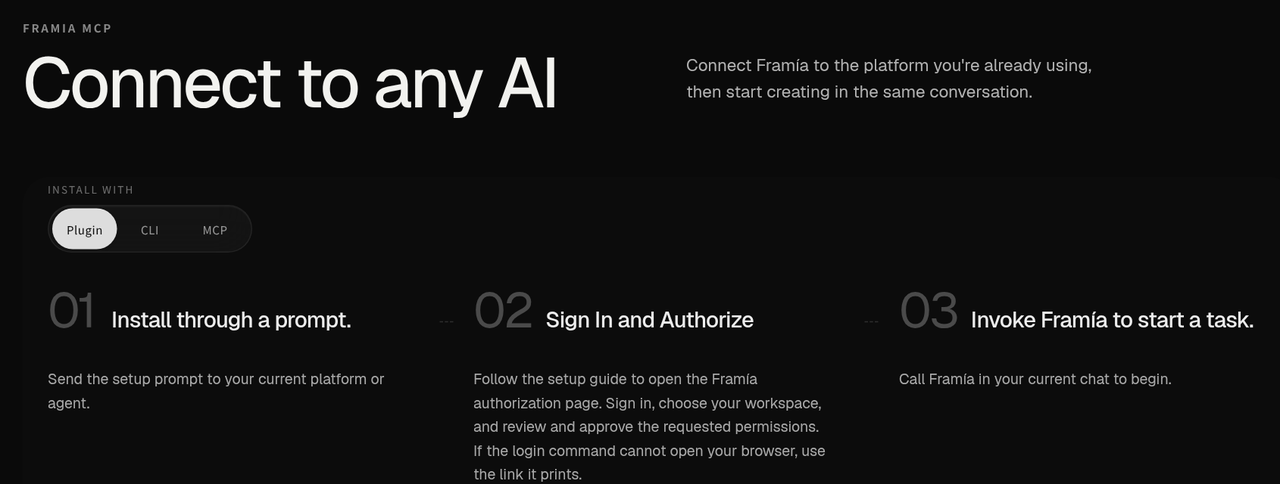
Get official packages from the Framia download center. Follow the Plugin, CLI, or remote MCP setup guide for your connection method. The image below shows the product page’s installation options.
Sign in and authorize
Choose which workspace the client can access and which actions it can take. Authorization is a little like giving a collaborator project access: permission to view projects does not automatically include permission to create tasks or delete content.
If you already authorized the Plugin or remote MCP connection, do not run the CLI login again. Check that you selected the permissions needed for this task, then continue to the connection check.
CLI users run:
framia auth login --environment prodKeep Terminal running while the browser opens. Sign in with your own Framia account, select the workspace, and grant these permissions:
- Read projects: project:read
- Create projects: project:create
- Submit tasks and check progress: task:execute, task:read
- Retrieve and download results: resource:read, resource:download
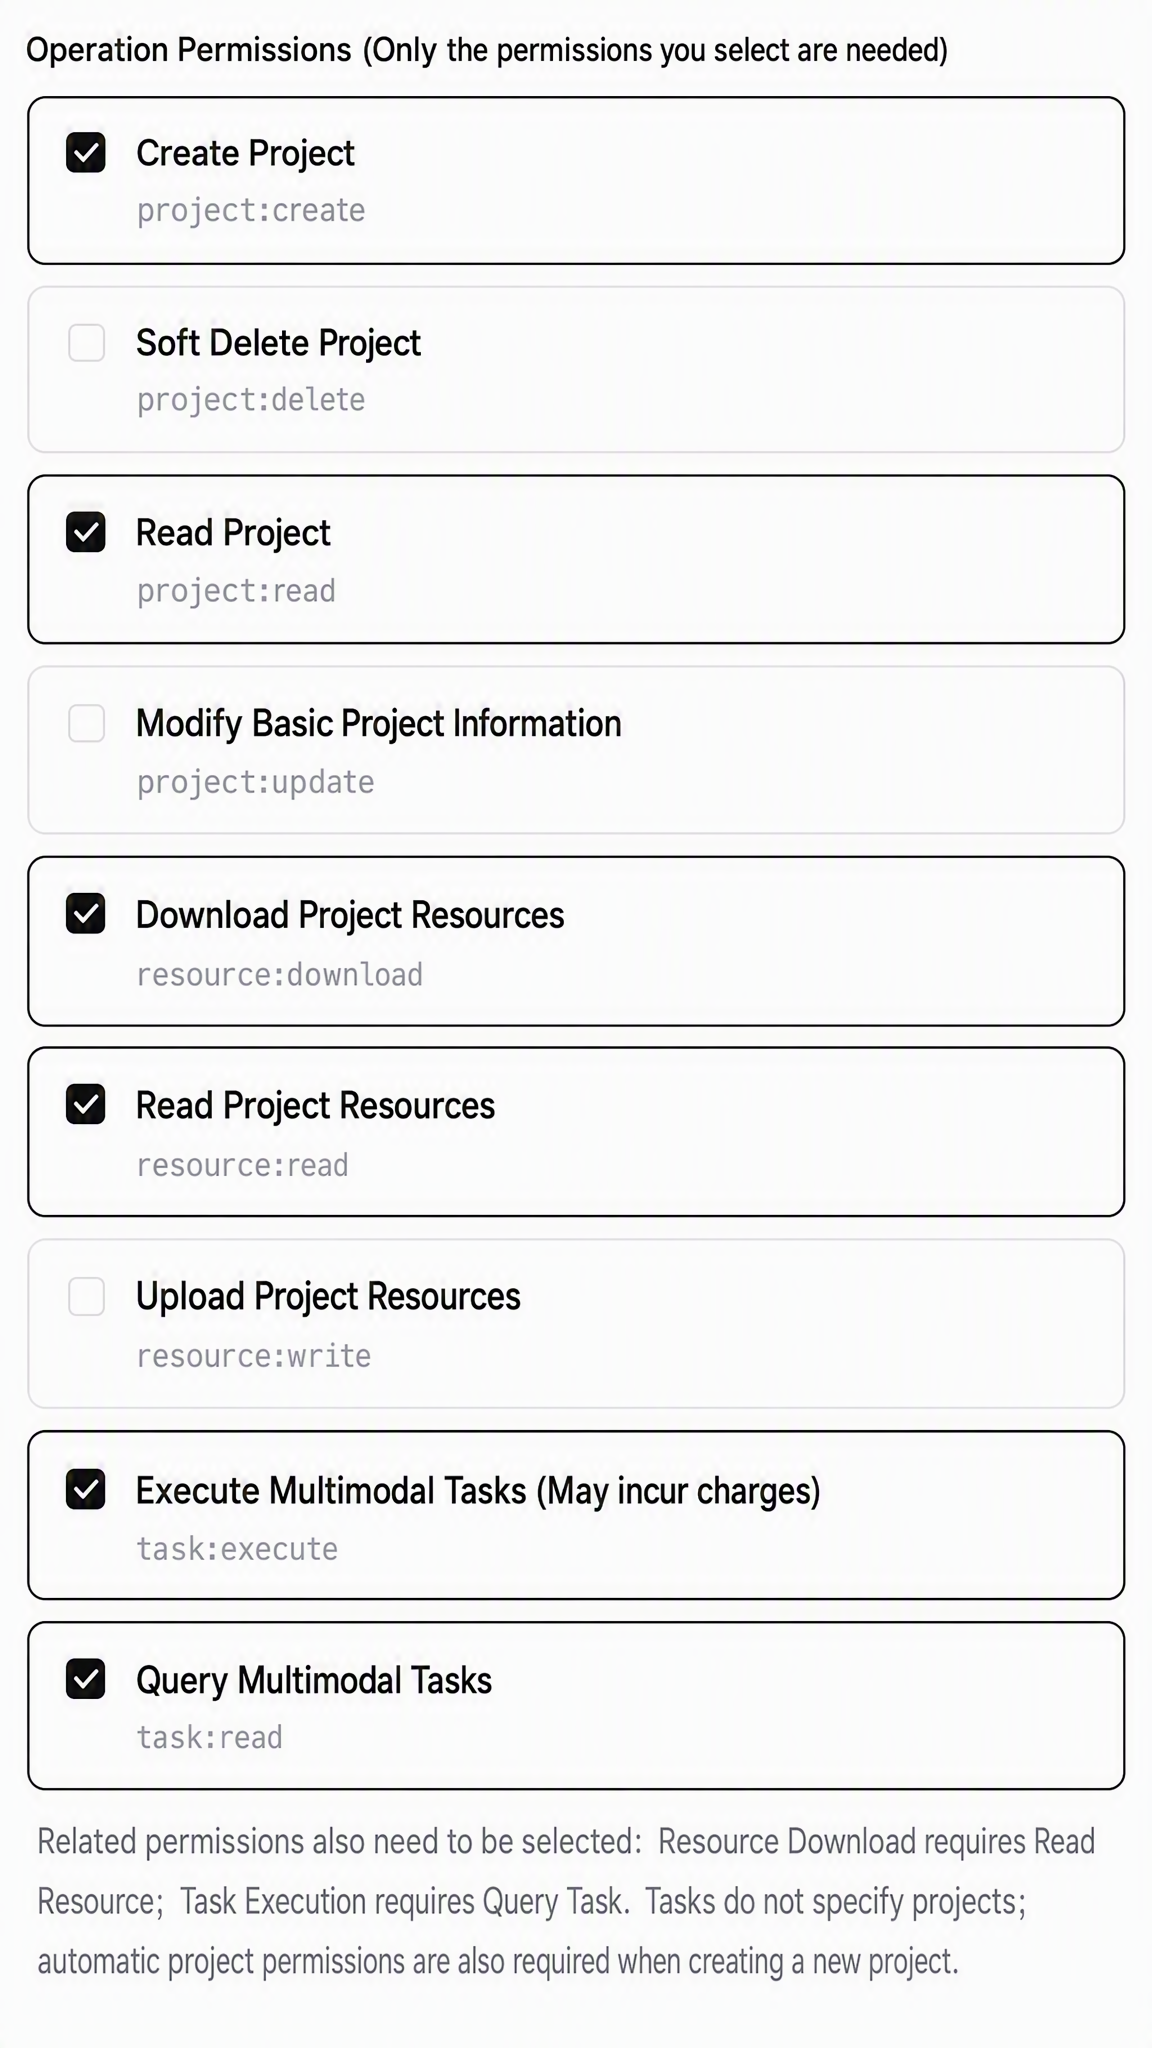
You do not need project-delete or resource-upload permission for this exercise. Your account’s existing access also limits which projects and resources you can use.
Confirm authorization. When the page says “Authorization received. Return to the terminal.”, return to Terminal and check that the login command finishes successfully.

If the browser does not open automatically, run this command and open the fresh link printed in Terminal. Finish authorization in a browser on the same computer running the client, not on your phone.
framia auth login --environment prod --no-browserTo change the workspace or permissions, authorize again:
framia auth login --environment prod --reauthorize --restartThe new authorization replaces the old one, so select every permission you still need.
Check the connection
Before generating an image, confirm that Framia can read your projects. CLI users run:
framia auth status --environment prod
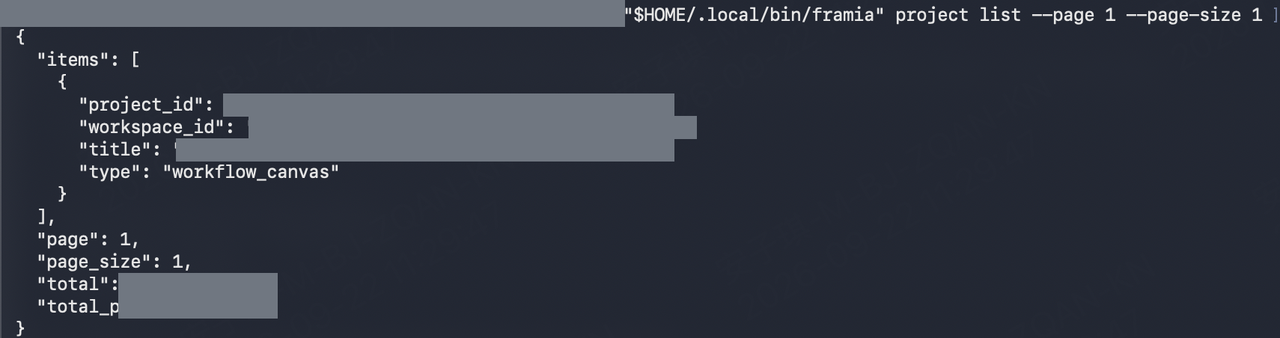
framia project list --environment prod --page-size 1
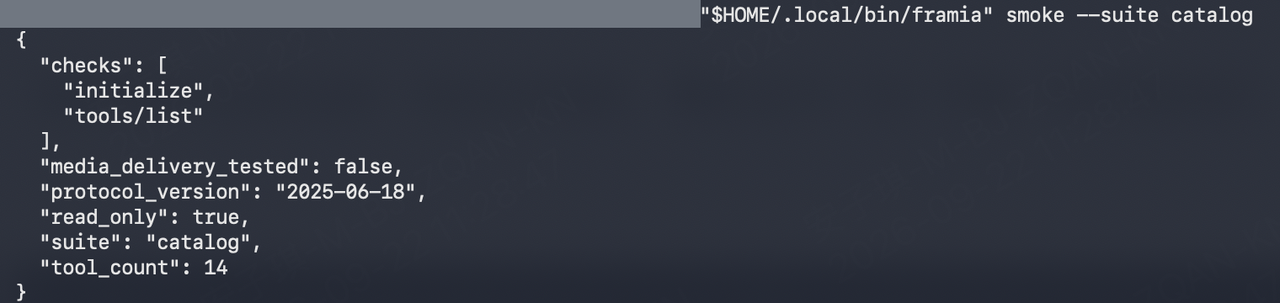
These are the read-only checks in the current ZIP’s Install.md: the first checks the standalone CLI authorization, and the second requests one project from the selected workspace without creating or modifying data. They do not check the separate Plugin profile. You can optionally inspect the tool catalog with framia mcp tools; the catalog screenshot below illustrates that separate check.
The response may contain plenty of quotes and brackets. That is JSON, a format programs use to exchange information. For now, check for errors and confirm that the project query succeeds; you do not need to understand every field. An empty list may simply mean your workspace has no projects yet.
Plugin and remote MCP users can open a new chat in their client and send:
List the projects in my current Framia workspace. Do not create or modify anything yet.
If tools appear in the catalog but the project query fails, check the workspace and read permission. Seeing a tool does not mean you have permission to execute it. These checks do not generate an image, so there is no need to spend credits testing the installation.
Create your first skincare ad image
Now try the image from the opening example. Write the brief as if you were describing a shoot to a photographer: what the bottle is made of, where it stands, where the light comes from, and which side needs space for copy. Those details give Framia more to work with than “make it look premium.”
Create a 16:9 skincare serum ad image. The main subject is an unbranded frosted blue glass bottle with a silver dropper cap, standing on an ice-blue glass pedestal. Add fine water droplets on the bottle, soft water-caustic reflections in the background, and silver-blue rim lighting around the glass. Use a realistic studio product-photography style with clear product details. Place the bottle slightly left of center and leave space on the right for copy. Do not add text, labels, logos, or watermarks.
With the Plugin or remote MCP, send this brief to your AI assistant and ask it to create the image in Framia. Open the canvas link returned by the task to review and approve generation settings. You can also create a project directly in Framia and submit the brief on the canvas.
CLI users can submit the task below. Generation uses account credits; the confirmation card shows the estimate before you approve.
Submit the task with the CLI
First, create an ID for this request:
uuidgen | tr '[:upper:]' '[:lower:]'The request ID works like an order number: it distinguishes retrying the same request from submitting a new one. Copy the complete string and replace REQUEST_ID below. Leave the other parameters unchanged for your first try:
framia task start --request-id REQUEST_ID --query "Create one premium skincare product advertising image in a horizontal 16:9 composition. The hero product is an unbranded frosted blue glass serum bottle with a polished silver dropper cap, standing on a translucent ice-blue glass pedestal. Add fine condensation droplets on the bottle, soft water-caustic reflections in the background, and silver-blue rim lighting that defines the glass silhouette. High-end studio product photography, realistic materials, crisp product details, elegant depth, and a restrained blue palette. Position the product slightly left of center with a little negative space on the right. The bottle must be clearly visible as the main subject, not an empty background. No text, labels, logos, or watermarks." --require-approval=trueThe text after --query is the creative brief. Because this command does not specify an existing project, Framia creates one for the task. The --require-approval=true flag asks for your confirmation at key steps that need approval.
Save the returned task_id and canvas_url, along with the request ID and full command. Use task_id to check progress and canvas_url to open the canvas. A running response means the task is underway, not that the image is finished.

Check progress and approve generation
CLI users replace TASK_ID with the returned task ID and run:
framia task progress --task-id TASK_ID- running: the task is underway. Check again after a short wait; if the response includes poll_after_seconds, use that interval.
- waiting_approval or waiting_user: the task needs your input. Open action_url or canvas_url to see what is requested.
- completed: the task has finished. Open the canvas to view the image.
You can also open canvas_url and follow progress in the browser. Do not keep resubmitting the same brief while you wait.
When generation needs approval, find the Confirmation before running card in the conversation panel on the right of the canvas. It lists the proposed model, image settings, and estimated credits.
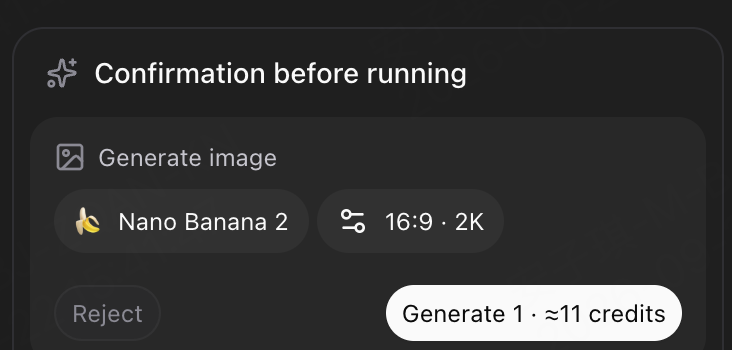
This example showed Nano Banana 2, 16:9, 2K, and one image. Check the settings and estimate on your own screen, then click Generate 1 once. Choose Reject if you do not want to proceed. You do not need to select Always allow. Approve from this card, not from the image node’s separate prompt editor.
View and download the image
When generation finishes, the image appears in the Skincare Serum Hero node. The conversation panel also reports that it is ready.
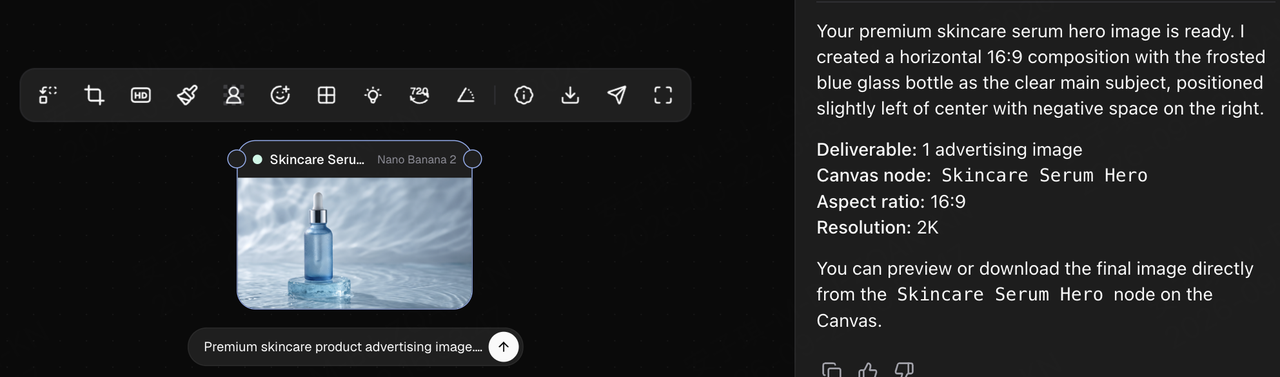
Select the image node to reveal its toolbar. Click the downward-arrow download icon to the left of the paper-plane icon. If several options appear, choose the image file. The upward arrow in the prompt field and the Run button at the top are not download controls.
Open the downloaded image and check the bottle’s material, droplets, and space for copy.
Troubleshooting
| Problem | What to do |
|---|---|
| Terminal reports command not found: framia | Run ~/.local/bin/framia version. If it displays the version, add the PATH setting to your shell configuration and open a new Terminal window. |
| The installation ZIP cannot be found | Check the filename and your current folder. Make sure Terminal is in the folder containing the ZIP. |
| macOS will not open the file or says it is untrusted | Confirm that the file came from the official download center and passed verification, then allow it in System Settings → Privacy & Security. Do not disable system-wide protections. Follow your administrator’s policy on a managed device. |
| Login fails, the workspace is wrong, or a permission is missing | CLI users: run framia auth login --environment prod --reauthorize --restart and select the workspace and all required permissions again. Plugin users: run the bundled ./framia/bin/framia --environment prod auth plugin-login; add --restart only when AUTH_INCOMPLETE requests it. Remote MCP users: use the host’s approved authorization flow. Do not delete credential files or use CLI auth status to judge the Plugin. |
| The connection check returns MCP_CONNECT_FAILED | Check your internet connection and whether Framia’s service is available. |
| An action returns PERMISSION_DENIED | Check the selected workspace and the permission required by the action. A successful login does not mean every action is authorized. |
| The task shows start_pending | Keep the original request ID and follow the response guidance. When retrying the same request, keep that ID and every parameter unchanged. |
| The task shows failed or canceled, or no image is available to download | Save the task ID and error details, then inspect the canvas. A retry keeps the original request ID and every parameter unchanged; a new creative request gets a new ID. Do not start another generation just to check progress. |
| The task is waiting for approval, but no card appears | Check the signed-in account and project link, then refresh once. If the card is still missing, query the status from the client that submitted the task. Do not resubmit the brief. |
FAQ
Do I need to know how to code?
No. Codex can help install the Plugin. The CLI option involves running a few commands in Terminal, but you do not need to write a program. Your creative brief still determines the subject, style, and composition.
Which AI platforms are supported?
The product page lists Codex, ChatGPT, Claude, Cursor, OpenClaw, Perplexity, and Hermes. The name alone does not guarantee compatibility: check the host version, remote Streamable HTTP MCP and OAuth support, and approved client registration. The Codex Plugin requires macOS Apple Silicon and a supported local Plugin flow. The CLI supports the operating systems listed in the current download center.
Can I create more than images?
Framia MCP also supports video and audio tasks available in Framia, along with project and resource operations. This tutorial starts with a single product image to make submission, approval, and download easy to follow.
Why can’t I generate after installing?
Installation only confirms that the program can run on your computer. Generation also needs the correct workspace, the required permissions, and sufficient account credits. Query your projects to check the connection, then look at the specific error.
Do I have to choose between the CLI and Plugin?
No. They can coexist and store their credentials independently. You can use the Plugin in Codex and the CLI in Terminal.
Do I need to authorize again after reconnecting?
Existing authorization for the same client and workspace can continue to work. Changing the client, workspace, or permission scope requires authorization again.
Try your next image
For another version, change the ice-blue setting to warm amber or a dark studio background and submit a new brief.
With the CLI, create a new request ID and replace the text after --query. With the Plugin or remote MCP, describe the new idea in the conversation. Open the Framia canvas to review generation settings, see the result, and keep working.
Have a brief in mind? Get started with Framia MCP and try it with your next product image, ad creative, or video.